> ## Documentation Index
> Fetch the complete documentation index at: https://docs.paybridgenp.com/llms.txt
> Use this file to discover all available pages before exploring further.
# Install PayBridgeNP on Shopify
> Step-by-step setup - install the app, create the manual payment method, paste your API key, place a test order.
Installing PayBridgeNP on your Shopify store takes about 5 minutes. No code changes on your site.
## Before you start
You need:
1. A **Shopify store** - any plan, dev store or live store, as long as its currency is **NPR**
2. A **PayBridgeNP API key** - get one from the [PayBridgeNP dashboard](https://dashboard.paybridgenp.com) under **Settings → API Keys**. Use `sk_test_…` to test, `sk_live_…` when you're ready to take real payments
## Step 1 - Get your install link and install the app
Each store gets its own private PayBridgeNP app, set up for you by the team.
1. Email [support@paybridgenp.com](mailto:support@paybridgenp.com?subject=Shopify%20install%20request) with your shop domain (`yourstore.myshopify.com`). We reply with your store's install link - usually the same day.
2. Open the link. You'll see Shopify's standard install consent screen, which lists the permissions the app needs - reading and updating orders, creating draft orders, reading and updating customer info (to send the payment-link SMS and email and attach the payer to the order), and reading product info.
3. Click **Install app**. Shopify redirects you to the embedded PayBridgeNP settings page inside your admin.
The install link is tied to your exact `.myshopify.com` domain and only works for that store. Running more than one store? Mention them all in the email.
## Step 2 - Create a Shopify manual payment method
This is the step most merchants miss. **Until you do this, no order will ever flow through PayBridgeNP.**
1. In your Shopify admin, go to **Settings → Payments**
2. Scroll to **Manual payment methods** (under "Additional payment methods")
3. Click **Add manual payment method**
4. At the bottom of the dropdown, pick **Create custom payment method**
5. Fill in the form:
| Field | Value |
| ------------------------------ | -------------------------------------------------------------------------------------------------------------------------------------- |
| **Custom payment method name** | `Pay with eSewa, Khalti, or Fonepay` (or any name you prefer - you'll paste the exact same string into the app settings in Step 4) |
| **Additional details** | `You'll receive a payment link by SMS and email after placing your order.` |
| **Payment instructions** | `After placing your order, you'll receive a secure payment link via SMS and email to complete payment with eSewa, Khalti, or Fonepay.` |
6. Click **Activate**
Your customers will now see this payment method at checkout.
The **Custom payment method name** you enter here must match exactly what you paste into the app's **Payment method name** field in Step 4. The match is case-insensitive, but any typo or extra whitespace will cause orders to be silently ignored.
## Step 3 - Paste your PayBridgeNP API key
Back in the embedded app (still in your Shopify admin, under **Apps → PayBridgeNP → Settings**):
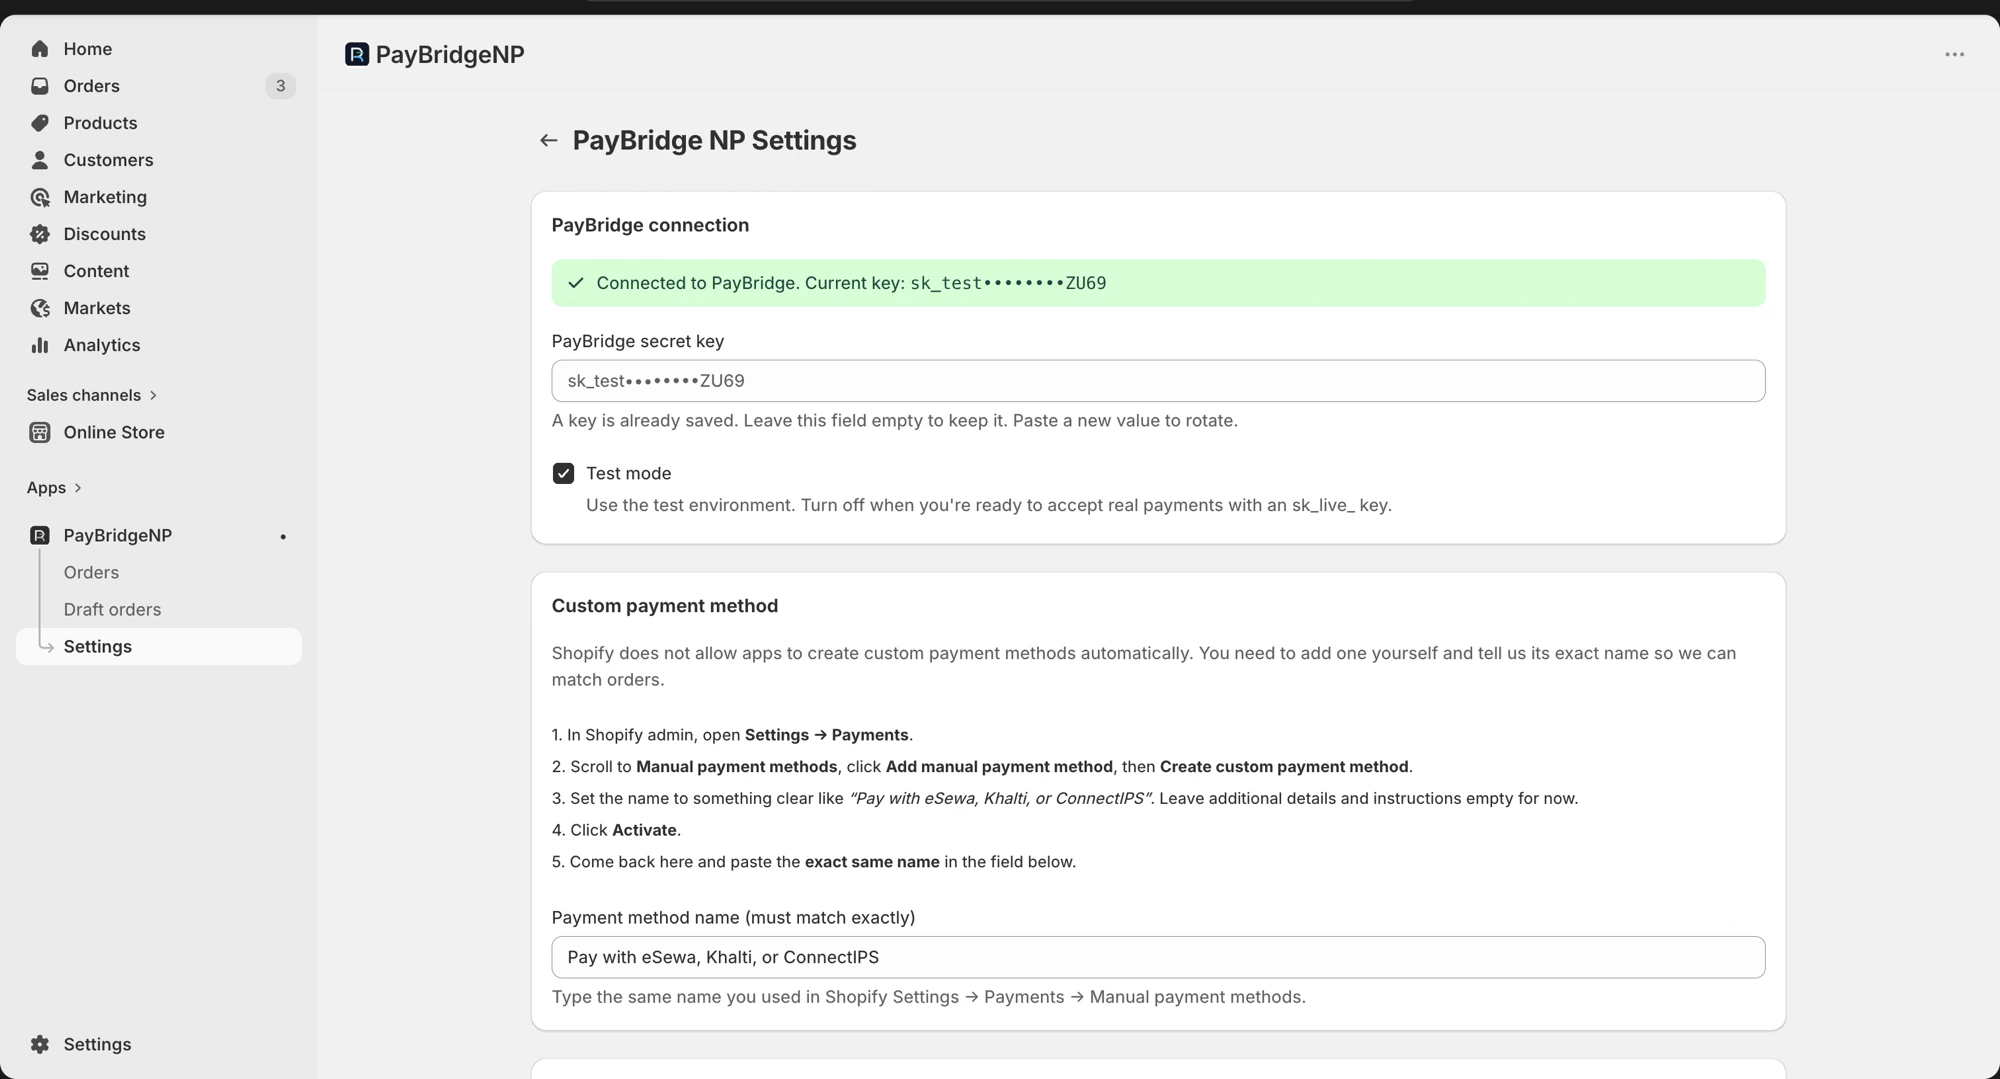 1. Find the **PayBridgeNP secret key** field
2. Paste your `sk_test_…` or `sk_live_…` key
3. Click **Save**
The app validates the key against your PayBridgeNP account and registers a webhook on PayBridgeNP for automatic order reconciliation. **Test mode** is on by default - toggle it off when you're ready to take real payments with an `sk_live_` key. If the key is invalid, you'll see a red banner with the specific error from PayBridgeNP.
Common causes when the key is rejected:
* Wrong environment (you pasted a live key but your PayBridgeNP project is in sandbox, or vice versa)
* Key was revoked or rotated in the PayBridgeNP dashboard
## Step 4 - Paste the payment method name
On the same settings page, find the **Payment method name (must match exactly)** field and paste **exactly the same string** you used for the Shopify payment method name in Step 2 (e.g. `Pay with eSewa, Khalti, or Fonepay`).
Click **Save**.
This tells the app which Shopify payment method to intercept. When an order comes in with a different payment method (cash on delivery, bank transfer, etc.), it's left alone.
### Other settings on the same page
* **Customer notifications** - SMS and email reminders are on by default. They fire when a customer places an order but doesn't pay within the configured window.
* **Draft-order send-link (Growth or higher)** - off by default. Enables a Draft orders page inside the app where you can pick a Shopify draft order and send the customer a PayBridgeNP payment link. Requires a Growth PayBridgeNP plan or higher.
## Step 5 - Optional: Add the "Pay now" block to the Customer Account order page
This is optional but improves the experience for buyers who close the tab without paying.
1. In Shopify admin, open **Settings → Customer accounts**
2. Click **Customize** on your Customer Accounts theme
3. Navigate to the **Order status** page in the editor's left nav
4. Click **Add block** and pick **PayBridgeNP Pay Now (customer account)**
5. Click **Save**
Now when a returning buyer opens their order page in their Shopify customer account, they'll see a **Pay now** button that takes them directly to the PayBridgeNP checkout. They no longer need the SMS or email link.
## Step 6 - Place a test order
Go to your storefront, add any product to cart, proceed to checkout, and at the payment step pick your PayBridgeNP payment method. Click **Complete order**.
### What should happen
1. Shopify creates the order in **Pending** state and lands the customer on Shopify's native thank-you page
2. Within \~30 seconds, the customer receives an **email** from "Your Store via PayBridgeNP" (their sender name is your store's name) containing a "Pay securely" button linking to the PayBridgeNP hosted checkout - and, on a live key, an **SMS** with the same link
3. The buyer taps the link, picks a wallet on the PayBridgeNP checkout page (eSewa / Khalti / Fonepay), and completes the payment
4. The Shopify order automatically flips to **Paid** within \~5 seconds of the wallet confirming
In test mode (`sk_test_` key), the SMS is **logged but never delivered** - sandbox SMS never reaches a real phone by design. Only the email arrives. You can see the would-have-been-sent SMS in your PayBridgeNP dashboard under **Account → SMS** (status `skipped_sandbox`). A missing test-mode SMS is not a broken install.
If anything above doesn't happen, jump to [Troubleshooting](/integrations/shopify/troubleshooting).
### Sandbox test credentials
If your PayBridgeNP API key starts with `sk_test_`, use these built-in test credentials on the PayBridgeNP hosted checkout:
| Provider | Credential |
| ---------- | ---------------------------------------------------------------------- |
| **eSewa** | ID `9806800001`, password `Nepal@123`, MPIN `1122`, Token/OTP `123456` |
| **Khalti** | Phone `9800000001`, MPIN `1111`, OTP `987654` |
Sandbox payments appear in your PayBridgeNP dashboard under **Sandbox** - no real money moves.
## Protected customer data
PayBridgeNP for Shopify reads the customer's email, phone, and name from each order so we can send the payment-link SMS and email. We also read the shipping address (and, when address collection is enabled on the checkout, write it back to the order).
We do not read order history beyond the current order, do not use the data for marketing, and do not run automated profiling. Customer email, phone, name, and shipping address are stored encrypted at rest with per-shop access isolation, and automatically nulled out 90 days after the order was created, once it has reached a terminal state (paid, cancelled, or expired). This satisfies Shopify's [Protected customer data](https://shopify.dev/docs/apps/launch/protected-customer-data) and data-minimization requirements.
## What's next
* [How it works](/integrations/shopify/how-it-works) - the end-to-end payment and refund flows explained
* [Troubleshooting](/integrations/shopify/troubleshooting) - common setup issues and how to fix them
1. Find the **PayBridgeNP secret key** field
2. Paste your `sk_test_…` or `sk_live_…` key
3. Click **Save**
The app validates the key against your PayBridgeNP account and registers a webhook on PayBridgeNP for automatic order reconciliation. **Test mode** is on by default - toggle it off when you're ready to take real payments with an `sk_live_` key. If the key is invalid, you'll see a red banner with the specific error from PayBridgeNP.
Common causes when the key is rejected:
* Wrong environment (you pasted a live key but your PayBridgeNP project is in sandbox, or vice versa)
* Key was revoked or rotated in the PayBridgeNP dashboard
## Step 4 - Paste the payment method name
On the same settings page, find the **Payment method name (must match exactly)** field and paste **exactly the same string** you used for the Shopify payment method name in Step 2 (e.g. `Pay with eSewa, Khalti, or Fonepay`).
Click **Save**.
This tells the app which Shopify payment method to intercept. When an order comes in with a different payment method (cash on delivery, bank transfer, etc.), it's left alone.
### Other settings on the same page
* **Customer notifications** - SMS and email reminders are on by default. They fire when a customer places an order but doesn't pay within the configured window.
* **Draft-order send-link (Growth or higher)** - off by default. Enables a Draft orders page inside the app where you can pick a Shopify draft order and send the customer a PayBridgeNP payment link. Requires a Growth PayBridgeNP plan or higher.
## Step 5 - Optional: Add the "Pay now" block to the Customer Account order page
This is optional but improves the experience for buyers who close the tab without paying.
1. In Shopify admin, open **Settings → Customer accounts**
2. Click **Customize** on your Customer Accounts theme
3. Navigate to the **Order status** page in the editor's left nav
4. Click **Add block** and pick **PayBridgeNP Pay Now (customer account)**
5. Click **Save**
Now when a returning buyer opens their order page in their Shopify customer account, they'll see a **Pay now** button that takes them directly to the PayBridgeNP checkout. They no longer need the SMS or email link.
## Step 6 - Place a test order
Go to your storefront, add any product to cart, proceed to checkout, and at the payment step pick your PayBridgeNP payment method. Click **Complete order**.
### What should happen
1. Shopify creates the order in **Pending** state and lands the customer on Shopify's native thank-you page
2. Within \~30 seconds, the customer receives an **email** from "Your Store via PayBridgeNP" (their sender name is your store's name) containing a "Pay securely" button linking to the PayBridgeNP hosted checkout - and, on a live key, an **SMS** with the same link
3. The buyer taps the link, picks a wallet on the PayBridgeNP checkout page (eSewa / Khalti / Fonepay), and completes the payment
4. The Shopify order automatically flips to **Paid** within \~5 seconds of the wallet confirming
In test mode (`sk_test_` key), the SMS is **logged but never delivered** - sandbox SMS never reaches a real phone by design. Only the email arrives. You can see the would-have-been-sent SMS in your PayBridgeNP dashboard under **Account → SMS** (status `skipped_sandbox`). A missing test-mode SMS is not a broken install.
If anything above doesn't happen, jump to [Troubleshooting](/integrations/shopify/troubleshooting).
### Sandbox test credentials
If your PayBridgeNP API key starts with `sk_test_`, use these built-in test credentials on the PayBridgeNP hosted checkout:
| Provider | Credential |
| ---------- | ---------------------------------------------------------------------- |
| **eSewa** | ID `9806800001`, password `Nepal@123`, MPIN `1122`, Token/OTP `123456` |
| **Khalti** | Phone `9800000001`, MPIN `1111`, OTP `987654` |
Sandbox payments appear in your PayBridgeNP dashboard under **Sandbox** - no real money moves.
## Protected customer data
PayBridgeNP for Shopify reads the customer's email, phone, and name from each order so we can send the payment-link SMS and email. We also read the shipping address (and, when address collection is enabled on the checkout, write it back to the order).
We do not read order history beyond the current order, do not use the data for marketing, and do not run automated profiling. Customer email, phone, name, and shipping address are stored encrypted at rest with per-shop access isolation, and automatically nulled out 90 days after the order was created, once it has reached a terminal state (paid, cancelled, or expired). This satisfies Shopify's [Protected customer data](https://shopify.dev/docs/apps/launch/protected-customer-data) and data-minimization requirements.
## What's next
* [How it works](/integrations/shopify/how-it-works) - the end-to-end payment and refund flows explained
* [Troubleshooting](/integrations/shopify/troubleshooting) - common setup issues and how to fix them