

In live mode, Embedded Checkout requires a Growth plan or higher. In sandbox mode, it is available on every plan. API-created sessions and payment buttons use the same mode-aware access rule.
Embedded Checkout is live. Nothing changes for an existing button until you
tick Open over my own page on it and add your origin to the embed
allowlist, so buttons keep redirecting until you opt them in.
Hosted or Embedded
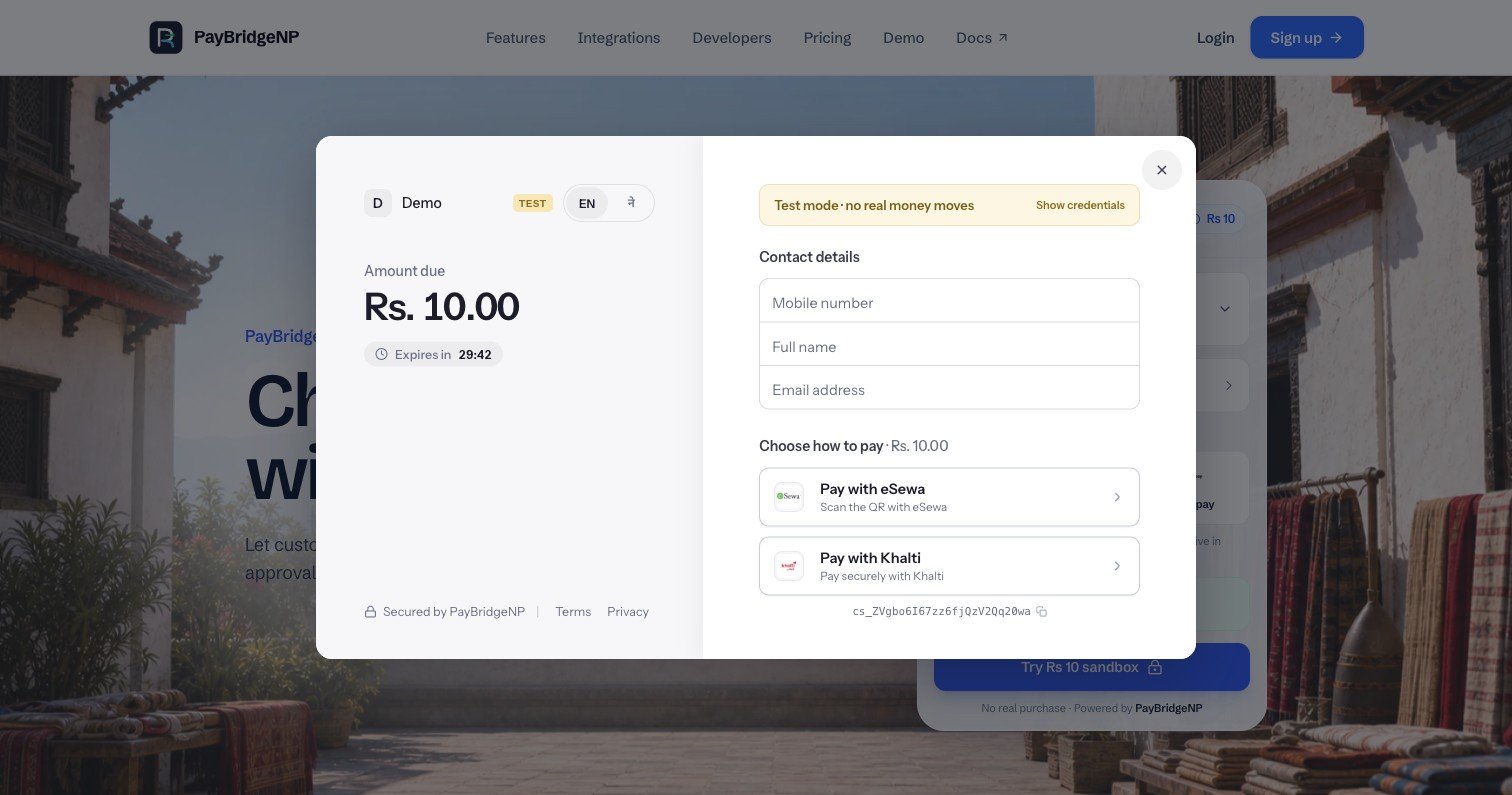
The merchant page remains visible behind the PayBridgeNP payment flow.
How it works
1
Create a payment button and turn the overlay on
Configure it as you would a normal
payment button, then tick Open over my own
page under “Where the checkout opens”. Buttons redirect to a
PayBridgeNP checkout page until you do, so an existing button never
changes behaviour on its own.
2
Add your origin to the allowlist
Register your web page origin under Project -> Embed domains in your
merchant dashboard.
3
Add the script to your page
The same one-line embed. No separate SDK.
4
The customer taps it
The overlay opens over your page. Your page is never navigated.
5
They pay and come back
The overlay closes and returns them to your return URL at the top level, not
inside the frame.
If your shopper is already signed in
Pass what you know and the overlay opens with it filled in:Use your own button
If our injected button does not fit your design, keep your own element and open the overlay from it. Adddata-render="none" to the script tag - it
renders nothing at all - and call window.PayBridgeNP.open() from your own
click handler:
- With several buttons on one page, pass the id:
window.PayBridgeNP.open("btn_your_button_id"). open()returnstruewhen the overlay is opening, andfalsewith aconsole.warnexplaining why when it is not - an unknown id, config still loading, or a checkout already in flight. Loading is worth handling: a shopper can tap your button before our script has fetched the button’s config, so either disable your button untilwindow.PayBridgeNPexists or retry on a short delay whenopen()returnsfalse.open()works on rendered buttons too.data-render="none"only controls whether we inject our element, not whether the API exists.
Cart totals and per-product prices
A payment button carries one fixed amount. That suits a single product, a service fee or a donation, and it does not suit a cart: you would need one button per product and still have no way to charge a cart total. For those, your server creates the session and your page frames it. The amount comes from your server, so a shopper cannot change the price in their browser. This is also the path for a product page where each product has its own price.1
Register the page origin
The same allowlist buttons use, under Project -> Embed domains. It is
per mode, so register sandbox and live separately.
2
Create the session with embedOrigin
Pass the origin of the page that will frame it. We check it against your
registered domains as the session is created, so a typo fails right there
with a 400 instead of turning into a blank frame later.
3
Open it with openSession
Hand the returned
checkout_url to window.PayBridgeNP.openSession(). You
get the same overlay a button gets: our backdrop, our mobile sizing, the
ready handshake, close-and-reopen safety, and the fallback to a full
checkout page if the frame cannot mount.4
They pay and come back
Same as a button. They return to your return URL at the top level, not
inside the frame, with the session id and status.
amount is in paisa, so 249900 is Rs 2,499.
Your page opens it. Load the script with no data-button-id, since there is no
button here, and it gives you the API and nothing else:
openSession() returns true when the overlay is opening. It returns false
with a console.warn when it will not: a checkout is already open on the page,
or the value you passed is not a session URL. Pass the checkout_url from the
API response as-is rather than rebuilding it, since anything that is not a real
session URL is refused.
A few rules:
embedOrigincannot be combined withflow: "redirect". Pick one.- The stored origin is re-checked against your current allowlist every time the page renders. Remove a domain and sessions already open stop framing, so it is a marker you can revoke rather than a standing grant.
- Live mode requires Growth or higher; sandbox is available on every plan.
Registering allowed embed domains
To protect your site and your customers from clickjacking, Embedded Checkout uses an explicit origin allowlist. A page attempting to embed your checkout whose origin is not registered on your allowlist will be blocked by the browser.The symptom of an unallowed domain
If your site origin is not registered on your project allowlist:- The checkout overlay opens as a blank frame and silently refuses to load.
- Your browser developer console displays a Content Security Policy error:
Refused to frame 'https://checkout.paybridgenp.com/' because an ancestor violates the following Content Security Policy directive: "frame-ancestors ..."
Domain allowlist rules
- Exact origins only: Enter full origins such as
https://shop.example.comorhttp://localhost:3000. Do not include paths (/checkout), query parameters (?ref=1), fragment identifiers, or trailing slashes. Wildcards (like*.example.com) are not permitted. - Apex and WWW are distinct:
https://example.comandhttps://www.example.comare two separate web origins. If your customers access your shop on both forms, register both origins in your allowlist. - Scheme and environment rules: Live mode requires secure
https://origins. Unencryptedhttp://schemes and private or loopback IP addresses are rejected in Live mode. Sandbox mode permitshttps://as well ashttp://for local testing onlocalhostand127.0.0.1. - Domain capacity: Each project can register up to 25 allowed embed domain origins per mode (Sandbox and Live).
- The two-key system: Registering your origin in the embed domain allowlist is required, but it is only half of enabling embedded checkout. The payment button itself ALSO needs Open over my own page ticked in its button settings. Both conditions must be met for the frame to render.
Paying with a wallet
eSewa and Khalti authenticate inside their own app or website. That is what keeps the customer’s PIN away from your site and from ours, so the overlay hands off rather than trying to contain it.- On a phone, the wallet opens in place and returns to the checkout when it is done.
- On a desktop, the wallet may open in a separate window that closes itself once the payment lands. The overlay shows a waiting state until it does.
- In an in-app browser (a link opened inside Instagram, Facebook, or a similar app), the wallet always opens in place. Separate windows are unreliable there.
Closing and reopening is safe
If the customer closes the overlay and opens it again, they resume the same payment, not a new one. Anything they had already typed is still there. This matters for more than convenience: it means one order can never produce two live payment sessions, so a customer cannot accidentally pay twice for the same thing.PayBridgeNP ID inside the overlay
PayBridgeNP ID works in the overlay, with one difference worth planning around. What works. A returning customer types their mobile number, we tell them we have their details, they enter a one-time code, and their name, email and phone fill in. Same as hosted checkout. What does not. They are not recognised before they type. On hosted checkout a returning customer is greeted by name on arrival; in the overlay they always start by entering their number. The reason is the browser, not a missing feature. Silent recognition depends on a cookie on the PayBridgeNP domain, and browsers deliberately withhold that cookie from a page running inside another site. The overlay is exactly that. For the same reason, “remember me on this device” is offered only on hosted checkout. The overlay does not show it, because the grant it creates could not be delivered.What you still handle
The overlay is the payment step only. Your cart, your prices, your discounts, and your order records stay yours. PayBridgeNP creates a session for an amount you give it and tells you when that amount is paid. Discount codes are a good example: apply them in your own cart and send us the final amount. There is no promo-code field in the checkout.Verifying the payment
Do not treat the overlay closing as proof of payment. Confirm it the same way you would for any other PayBridgeNP integration:- Listen for the
payment.succeededwebhook, which is signed and retried until you acknowledge it. - Or read the session back through the API.
Limits
- Each button opts in separately. A button you have not ticked keeps redirecting.
- The overlay renders only on allowed origins registered for your project in the active mode.
- Wallet payments briefly leave the overlay, by design.
- Returning customers are not recognised until they enter their mobile number. Hosted Checkout greets them on arrival; the overlay cannot.
- A button’s amount is fixed, so a button suits a fixed price. Never drive a
cart total from a custom-amount button: it takes its amount from the page,
which means the browser can change it. For carts and per-product prices, have
your server create the session with
embedOrigininstead, as described in Cart totals and per-product prices. - Platform plugins (WooCommerce, Shopify) use Hosted Checkout and cannot open the overlay.